Reflection: Project Dreamweaver
Assalamualaikum
Entri kali ini merupakan reflection kepada apa yang telah saya pelajari Adobe Dreamweaver sepanjang kelas sebelum ini. Kami satu kumpulan yang terdiri daripada Ana Haziqah, Nor Farhah dan saya Nornadiah telah buat keputusan untuk buat Online Cake House.. Tujuan kami membina laman web ini adalah kerana x ramai peniaga di luar sana yang membina online cake. Yang selalu kita dengar adalah pakaian,handbag,accesories, dan banyak lagi. Lagi satu, kami memang suka sangat dengan kek ni. Oleh itu, ianya menjadi inspirasi buat kami untuk menyiapkan laman web ini dengan sungguh-sungguh. Kami juga telah membuat keputusan untuk membina dengan menggunakan PHP dan MySQL. =D
Orait, cuba kita ingat kembali langkah2 sebelum membina laman web:
1. Install web server (xampp)
2. Install Dreamweaver CS3
3. Define site in Dreamweaver CS3
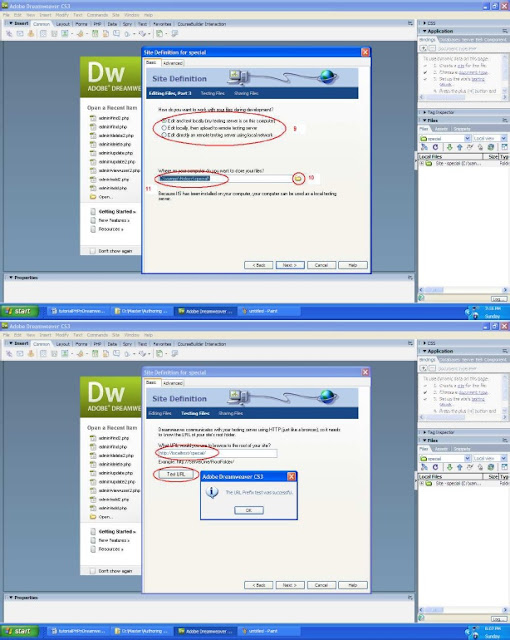
1. Open Dreamweaver CS3
2. Click Site > New Site
3. Type site name > tasteofhome
4. Type HTTP URL address site > http://localhost/tasteofhome/
5. Click Next
6. Setting server technology > YES, I want to use a server technology
7. Select PHP MySQL
8. Next
9. Select 'Edit and test locally (my testing server is on this computer)'
10. Click folder icon to choose local root folder for site. Make sure store file in c > xampp> htdoc
12. Type site name at URL site root
13. Test URL. If successful, click OK and proceed next.
14. Select No and proceed next.


4. DEACTIVE Internet Information Services
1. Start> Control Panel > Administrative Tool > IIS
2. +Websites > default website
3. Click STOP button
5. LOCALHOST - Run Xampp
1. Open Xampp Control Panel
2. Make sure run Apache and MySQL

6. Developing and Designing Website PHP and MySQL
1. Create database
Our database for this project named tasteofhome. We decide not to make password to our database because we worried that Prof Zaida could have problem later when opening our project. But then it is required to make password for security to our database.
2. Create table and insert data
Inside tasteofhome database contains 4 tables that are:
1. orderform - hold user's information and order.
2. signup - hold user's email, username and password when registered.
3. contact - hold user's information and feedback.
4. admin - hold admin's username and password.

3. Setup connection between PHP and MySQL

______________________________________________________________________
For our project, our group has agreed to used PHP and MySQL to develop online cake house. This project has reflected all that we learnt in class before. Many elements such as image, video, hyperlink, anchor, layers and etc was included during web development. This online cake house is actually a webpage that allow user to view our product and can place an order after their sign up as member. But then, user must have come to our outlet to make payment and get the products.
There are two level of users in this webpage: 1. User 2.Admin. This two users have different level of access. User can only view the webpage, place an order and send a feedback. Meanwhile, admin have the authority to view webpages, insert user, delete user, view user, edit user, insert order, delete order, view order and edit order. Below I will display the interface between this two users:
USER
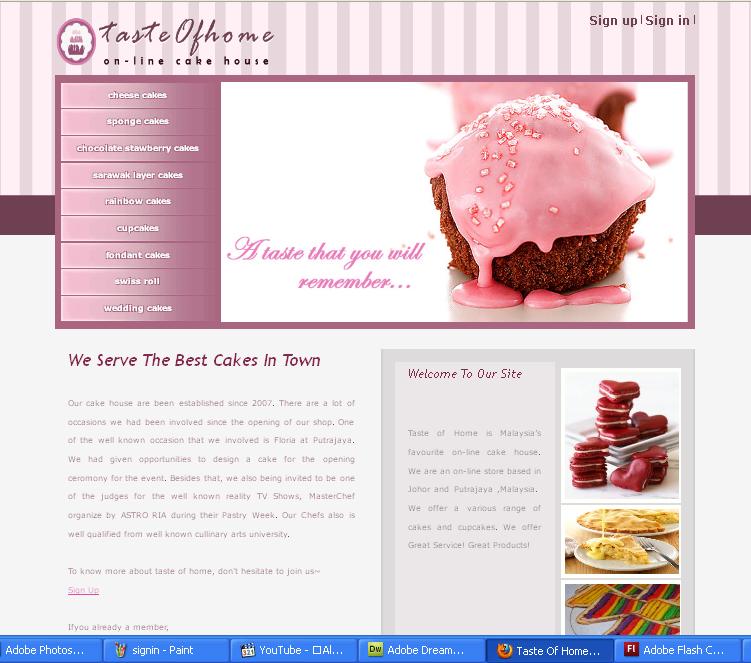
If users are not registered, they only can see home page of the website.
1. User must first to sign up as member before sign in into the webpage. For sign up we use concept of integrating security into an application with registration page. We use Check New Username behavior to avoid different users from using the 100% same username as previous user. We also create a message to inform the user that the username has been used by other users.


2. After that, user must sign in to view product and place an order. Sign in also called as integrating security into an application. For integrating security just go Server Behaviors > User Authentication > Log In User. In this project, we just select Username and Password for Restrict Access Based.

3. Now, the users can view Our Product, About Us, Services, Recipes, Order Form and Contact Us. We insert all elements in our webpages such as image, video, link, anchor, button, text and etc.
i. Our Product
This webpage will view all our products available in our cake house such as doughnuts, tarts, cakes, desserts, muffins, and macarons.

If we click button desserts, the webpage will direct to desserts webpage.All list of desserts will display as below.

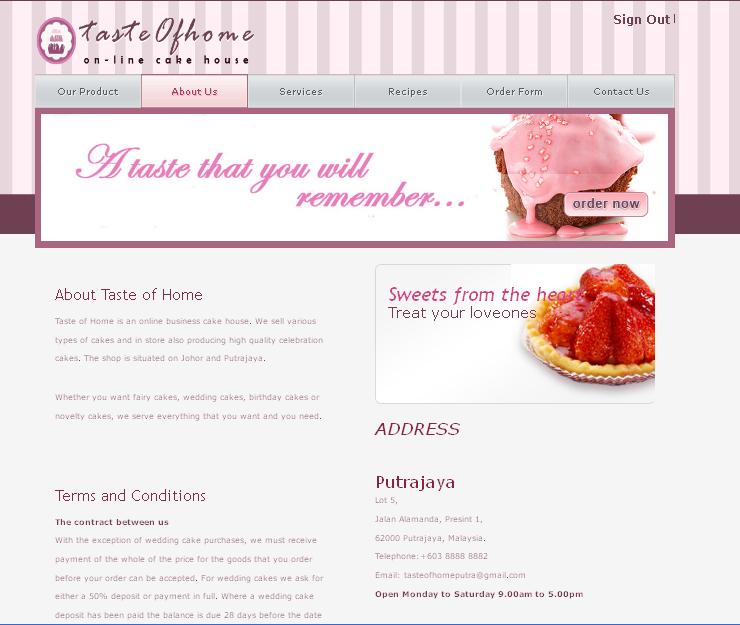
ii. About Us
This will display information about our cake house.
iii. Services
Besides sold out cakes, macarons, dessert and so on. We also provide other services such as Cakes' Classes, Celebration, Wedding Ceremony, Opening Ceremony, Family Day and etc.

This webpage will show you the hot recipes in this year with a video demonstration on how to cook it.


Users can place their order in this webpages. To store user's order into the database, we use Insert Record behavior.

Then, we use RecordSet to view user's order from database. It will be references for the users to check whether the order submitted is correct or not.

vi. Contact Us
Users can send a feedback or suggestion by clicking Contact Us tab.

_______________________________________________________________________
ADMIN
1.For admin they dont have to sign up because the admin will register or specified by developers. But then, they still have to sign in before view admin webpages.
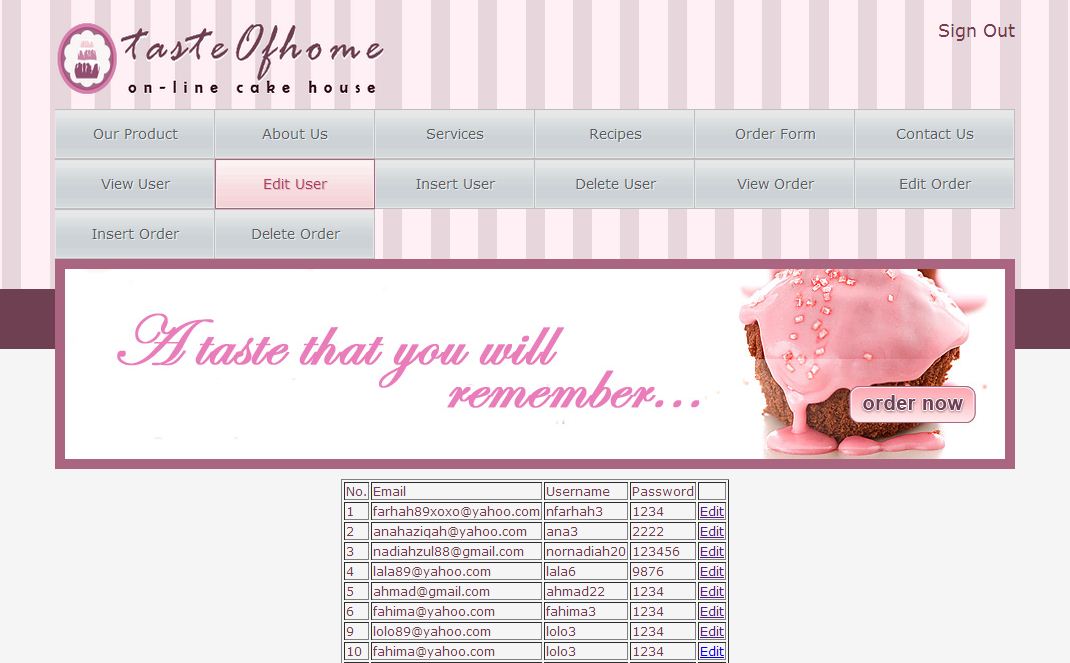
2. Admin can view all webpages same as users and added webpages such as view user, edit user, insert user, delete user, view order, edit order, insert order and delete order.
3. Belows are captured screens that additional webpages that admin can view
i. View User
This webpage will view all the user's email, username and password that registered before. As I mentioned before, we use RecordSet to view user's information from database.

ii. Edit User
1. For edit user, we create two php files; edituser.php and edituser2.php. It is because for edituser.php, it will display all the user registered meanwhile edituser2.php will display the information that you want to edit or update.
2. In edituser.php file, we use RecordSet too for view user's information from database.
3. Then, we highlight the second row and perform Repeat Region. Repeat Region is used to display how many data from database to your webpage. You can set it by click Application > Server Behaviors >+ > Repeat Region.
4. Highlight the ID Recordset. Click Application > Server Behaviors > +> Go To Detail Page. The function of Go To Detail Page is to provide more details on a single database record. To retrieve details on only one record, the detail page must include a recordset that filters the records of a database table based on some unique identifier. Thats why we use ID to find information on just a single and simply search for one record that matches a particular ID number. In other words, create a recordset that filters the data based on that ID number.
5. In edituser2.php file, we insert Update Behavior so admin can updating information on users.

iii. Insert User
Admin can also insert new users.
1. Insert form.
2. Insert table and place it in the form
for lay out.
3. Insert form > textfield for email.
Edit textfield properties (at the bottom page). Instance name for textfield to email.
4. Repeat insert form > textfield for username and password.Make sure for password select radio button password
properties.
5. Select Application > Server Behavior
> + > Insert record.
6. Insert record details need to fill this section :Connection, Insert table, column, After inserting go to. For column choose ID.
7. Done and test in browser.

iv. Delete User
1. Open page deleteuser.php
2. Use Recordset
3. Insert > Form > Form.
4. Insert table into the form. 2
rows, 5 columns. Insert Delete link in column 1 to
link to page deleteuser2.php.
5. Binding recordset into table.
6. Edit PHP Code. Highlight on delete link
then click code or split. Add code and save.
<a href="deleteuser2.php?recordID=<?php
echo$row_Recordset1['ID'];?>" tar et="_
arent">Delete</a>
This action will link to deleteuser2.php and display information of ID that user choose to delete.

Open deleteuser2.php, perform this steps.
1. Insert > form > form.
3. Insert > table > rows:4,
columns:2.
4. Insert > form > text field (for
all field want to show to the table).
5. Insert > form > button. (Delete
button).
6. Insert > form > Hidden
Field.Click Hidden Field icon > Properties > change name to
hidden1
7. Setting Recordset.Application >
Binding > + > Recordset
Set filter to ID = URL Parameter recordID.
8. Binding Recordset into table.
9. Binding Recordset into hidden field
•Click Hidden Field icon > Properties
•click icon 'lightning bolt'
•in dynamic data > click ID
•click OK.
10. Click Application > Server Behaviour
> + > Delete Record
Primary key column: ID , untick numeric
Primary key value: Form Variable , hidden1.
11. Save and test in
web browser.

*The steps for view order, edit order, insert order and delete order are likely the same as steps in above for user.
v. View Order

vi. Edit Order


vii. Insert Order

viii. Delete Order

Before delete the order, it will display the information details for admin to confirmation.

No comments:
Post a Comment