Reflection Week 14
Assalamualaikum
Minggu ini kelas kami dimulakan dengan membuat 4 aktiviti di facebook iaitu:
Aktiviti 1
Develop a motion tween animation of pendulum
Aktiviti 2
Develop a morphing animation of butterfly lifecycle. Start from lava to butterfly.
1. Sketch the egg, caterpillar, pupa and butterfly using onion skin tool.
2. On first layer, type the text, box and arrows.
3. Create a new layer.
4. Import egg,caterpillar, pupa and butterfly image to library. Then convert to graphic symbol.
5. On frame 1 insert egg graphic, then break apart. Next insert keyframe on frame 25, add caterpillar graphic and break apart. Create motion tween between the frames.
6. Next continue insert keyframe on frame 50,add pupa graphic and break apart. Create motion tween between the frames.
7. Then add butterfly graphic on frame 75 and break apart. Create motion tween between the frames.
8.Lastly, add egg graphic on frame 100 and dont forget to break apart. Create motion between the frames.
9. Save your file and test movie.
Aktiviti 3
Implementing frame by frame skill, sketch a cartoon and animate it.
1. Sketch animated panda by using onion skin tool.
2. Then insert the panda sequence images from frame 1 until frame 20. Dont forget to insert keyframe for each image.
3. To make panda moving, we must insert motion tween between the keyframes.
4. Thats all, save and test movie =D
This is another frame by frame movie
Aktiviti 4
Animate the process of pollinating agent
Seterusnya, kami diberi tugasan App 4 untuk disiapkan dan dimuat naik di dalam google sites.Sebelum itu, mari kita lihat apa yang terdapat dalam App4.
Terdapat empat types of interaction dalam flash iaitu:
1. Creating Main Menu
Creating main menu buttons is essential for interactive website to navigate from one page to another.
2. Multiple Choice Questions
This type of applications allow students to get interactive feedbacks from the content. Users could also could create flash-based quizzes with multimedia elements, such as images, sounds, narrations, movies and so on.
3. Text Entry Questions
Allow users to develop quizzes and allow interactive communication between the user and the content.
4. Drag and Drop
It is another applications that users could build in flash to make learning activities more fun and interesting.
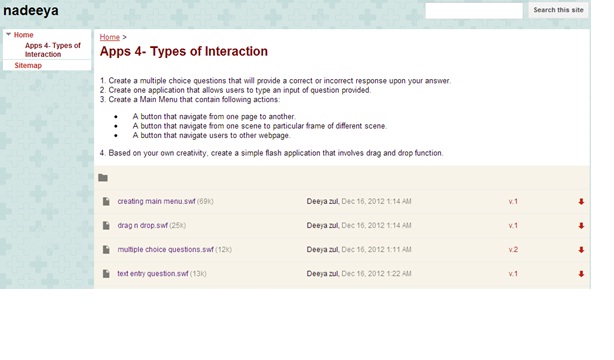
Aktiviti 4
Seperti biasa kami akan diberikan aktiviti setelah habis kelas. Aktiviti 4 ini boleh dilihat dari google site saya nadeeya.Berikut merupakan hasil aktiviti yang telah saya lakukan:
Question 1
Creating Multiple
Choice Questions
- Rename the layer as question > select text tool > change to static text at properties windows > type your question.
- Insert a new layer named buttons > create four oval tool (A,B,C,D) > Then convert to symbol as button > OK.Then click text tool > type the answer.
- Create a new layer renamed as response. In the layer, select text tool > change to dynamic text at properties windows.
- Create another layer named as actions, write this command at actions script.
var response
response = “ “
5. On the right answer button, write this command
at actions script.
on(release)
{respon = “Congrates, your answer is
correct”);}
6. Do the same command to other buttons but this
time change the respon as below:
on(release)
{respon = “Your answer is wrong”);}
7. Test your movie and finished!!!
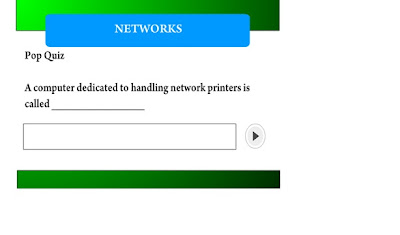
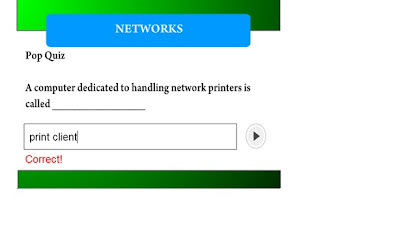
Inilah hasilnya selepas mengikuti langkah-langkah dalam Apps 4.

Paparan skrin ini menunjukkan apabila pengguna memilih jawapan yang tepat.

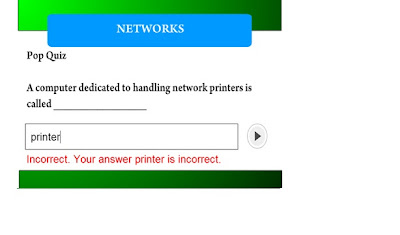
Manakala, paparan skrin tersebut akan keluar jika pengguna memilih jawapan yang salah.

Question 2
Text Entry Question
- Create a layer named background, make sure that the topic as static text.
- Insert a new layer and named as question, type the questions. Draw a text tool as input text for the user to input the answer. Then draw another text tool under it as dynamic text.
- After that, create a new layer named as button. Then choose a playback button from the library and create besides the text.
- Create a stop layer, type this command to the actions script.
stop();
var answer;
var respon;
answer = “ “
respon = “ “
5. Select the playback button, right click and type
this command to the actions script.
on (release) { if(answer == ”print client”) { respon = “Correct!”;
} else {
respon = “Incorrect. Your answer “+ answer
+” is incorrect.”;
}
}
on (release, keyPress “<Enter>”) {
if (answer == “print client”){ respon = “Correct!”;
} else {
respon = “Incorrect. Your answer “+ answer
+” is incorrect.”;
}
}
6. In the input text field, type the var as answer
meanwhile in the dynamic text field as respon.
Don’t forget to untick Auto kern
in the window properties.
7. Test your movie by press Ctrl+ Enter and done!!!!
7. Test your movie by press Ctrl+ Enter and done!!!!
Inilah hasilnya selepas mengikuti langkah-langkah dalam Apps 4.
Question 3

Paparan skrin ini menunjukkan apabila pengguna memilih jawapan yang tepat.

Manakala, paparan skrin tersebut akan keluar jika pengguna memilih jawapan yang salah.

Question 3
Creating Main Menu
- Create the basic interface such as insert logo image, header for the website and button (home, about us and services).
- For each button, field the instance name. For example, the home button will named as home in the instance button. And goes to another buttons.
- Create a new scene for another section, by click Windows > Other Panels > Scene> Scene Windows will appear. Click duplicate symbol to copy a new scene. Rename the scene as Scene 2 and close the Window.
- Insert some text in Scene 1 and Scene 2 to differentiate the scene. Then test the movie to see whether the scenes are different.
- Put stop(); command in actions script in the buttons layer so that the two scenes will not keep on blinking.
- Insert frame at frame 15 for each layer so that if we click the button, it will direct to the required scene. Do this on Scene 1 and Scene 2.
- In Scene 2, create a new layer and named it as about us. Then, renamed the frame as aboutpage. Create another layer for stop command in actions script.
- Go back to Scene 1, right click on about us button and click actions.Type
on(release)
{gotoAndPlay (“Scene 2”, 1);}
9. To make the the home button activated, go to
scene 2 and right click on home button to write
command in actions script.
on(release)
{gotoAndStop (“Scene 1”, 1);}
10. Press Ctrl+Enter to test the movie, you can see
that if you click Home button, it will go to
Scene 1 and Scene 2 if you click
About Us button.
11. Create a new button in Scene 2 for more
information about the library. On the frame 10 in
about us layer,named the frame as moreinfo. Then type text for the more information. After
that, renamed the more button as moreBtn.
about us layer,named the frame as moreinfo. Then type text for the more information. After
that, renamed the more button as moreBtn.
12. Right
click on the More button, then add command actions script.
on(release)
{gotoAndStop (“Scene 2”, “moreinfo”);}
13. Lastly, steps on how to navigate the Services
button to other website. Go back to Scene 2,
then add actions script in Services button. Repeat step 13 for Scene 2.
then add actions script in Services button. Repeat step 13 for Scene 2.
on(release)
{getURL (“http://web.utm.my/psz/”);}
14. Test your movie whether it is working or not and finished!!!
14. Test your movie whether it is working or not and finished!!!
Inilah hasilnya selepas mengikuti langkah-langkah dalam Apps 4. Paparan skrin ini menunjukkan pengguna berada di skrin home.

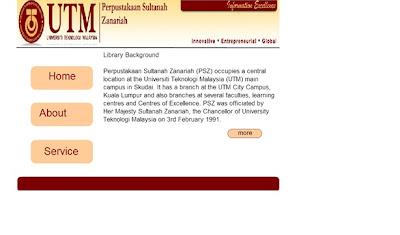

Manakala paparan skrin ini menunjukkan pengguna berada di skrin about.

Apabila pengguna tekan button more, paparan skrin ini akan keluar.

Seterusnya, pengguna akan ke website lain jika menekan button service.

Drag and Drop
- Create your interface by insert 3 rectangle named as dog,cat and rat in the rectangle layer. Then convert them to symbol as movie clip.
2. Then insert another layer and named as pictures.
Insert the image of dog,cat and rat to the
stage. Convert them to symbol as movie clip.
3. Next step, right click on the dog rectangle shape and insert this command.Repeat this step for
another rectangle shape and pictures.
stage. Convert them to symbol as movie clip.
3. Next step, right click on the dog rectangle shape and insert this command.Repeat this step for
another rectangle shape and pictures.
on (press) {
startDrag(this,true);
}
on(release) {
stopDrag();
}
4. Don't forget to test your movie okay =D
4. Don't forget to test your movie okay =D
Inilah hasilnya selepas mengikuti langkah-langkah dalam Apps 4. Pengguna boleh menggerakkan gambar haiwan tersebut ke tempat jawapan yang disediakan.

Paparan ini menunjukkan jika pengguna sudah selesai menjawab soalan.

Akhir sekali, ini merupakan paparan apabila saya telah memuat naik aktiviti-aktiviti tersebut di dalam Google Site =D