Monday, 7 January 2013

Reflection: Project Flash


Reflection: Project Flash


Assalamualaikum


For our project,our group has agreed to developed learning courseware on topic numbers for kindergarden.We used Adobe Flash Professional CS3.This project has reflected all that we learnt in class. Many elements such as motion tweening, shape tweening, frame by frame, multiple choice question, text entry question,and drag and drop was included during courseware development.This learning courseware is designed to help children learn the names and spelling of numbers.A numbers song to the ten little tune that makes children easily to follow.Besides that, this courseware also include with exercise for children to practice.This courseware include 3 pages: 1.About 2.Numbers 3.Exercises.


ABOUT
This will explain about this coureware and its function.

Do you realize that there is more button.If you click on more button, it will display more information. Behind the more button, insert this action script:


on(release){
gotoAndStop("Scene 2","more");
}

It cause the playhead to jump to scene 2 in frame named more and stops from progressing further. The action script also means that it will link from one frame to another frame in the same scene in file.


NUMBERS

A numbers song to the ten little tune that makes children to sing along.
There also a button will link to youtube for more videos on learning numbers.
This numbers song, we decided to design in a new flash file named number.fla. We develop this song by using many types of animation such as motion tweening, shape tweening, and frame by frame. The shape of number 1-10, we tracing using onion skin tool.You can view this video on my google sites nadeeya.

Behind numbers song button, we include this action script:


on(release) {
    gotoAndStop("Scene 7",1);
}


Behind Back button, we put this loadMovieNum( ) function because it will link from one flash file to another flash file.


on (release)
{
loadMovieNum("main menu project.swf",1);
}


Meanwhile, behind the Youtube button, put this getURL( ) because we want to link to the Youtube website.

on(release)

{ getURL("http://www.youtube.com/watch?v=5IO24dCmxk0");}


EXERCISES

Include 3 exercises for children to practice.We apply all the application of interaction that are text entry question, multiple choice question and drag and drop.


1. Text Entry Question (Exercise 1)

This text entry question will ask the users to type the answer for the question. We use static text for the question, input text for the users to give answer and dynamic text to display or response either the answer is correct or not.


Below are screen capture if the user answer the correct answer. The action script behind the playback button are:

Action script if the user press playback button


on (release) { if (answer == "five") {respon = "Correct!";
} else {
respon = "Incorrect. Your answer "+ answer +" is incorrect.";
}
}

If the user press Enter


on (release, keyPress "<Enter>") {
if (answer == "five") {respon = "Correct!";
} else {
respon = "Incorrect. Your answer "+ answer +" is incorrect.";
}
}


User input the wrong answer


2. Multiple Choice Question (Exercise 2)

User have to choose one answer by click on the button (A,B,C,D)


If the users choose answer A, the respon will said "Congrates, your answer is correct!!!" 
The action script behind the A button as below:

on (release) {
respon = " Congrates,your answer is correct!!!";
}


Meanwhile if you choose the wrong answer that is besides A. This response will display " This is not the right answer". The action script is:


on (release) {
respon = " This is not the correct answer";
}


3. Drag and Drop (Exercise 3)

The last exercise is to drag the number to the correct answer .


This is action script behind the rectangle:


on(press){
startDrag(this);
}

on(release){
stopDrag();
if((this._x>=378.4)&(this._x<=427.8)&(this._y>=230.2)&(this._y<=269.9))
{
_root.box2.gotoAndStop (2);
}else{
_root.box2.gotoAndStop (1);
this._x=93.5;
this._y=117.6;
}
}


Behind the pentagon:


on(press){
startDrag(this);
}

on(release){
stopDrag();
if((this._x>=398.1)&(this._x<=442.8)&(this._y>=281.8)&(this._y<=289.3))
{
_root.box1.gotoAndStop (2);
}else{
_root.box1.gotoAndStop (1);
this._x=112.2;
this._y=179.6;
}
}


Behind the oval:


on(press){
startDrag(this);
}
on(release){
stopDrag();
if((this._x>=383.4)&(this._x<=424.3)&(this._y>=128.4)&(this._y<=160.6))
{
_root.box1.gotoAndStop (2);
}else{
_root.box1.gotoAndStop (1);
this._x=92.0;
this._y=323.9;
}
}


Antara kesukaran yang dihadapi dalam membina learning courseware ini adalah untuk match kan animation dengan lagu adalah sama.. So kita orang kena la ulang lagu tu banyak2 kali.. sangat bosan dan muak bila dengar lagu tu banyak2 kali.. Memang setahun akan datang, xnk dengar lagu 10 little number ni hehehe.. Tapi bagusnya, kami dapat belajar macamana nk membina courseware serta teknik2 yang bersesuaian.Untuk jangka masa panjang, bolehlah buat sendiri courseware untuk anak-anak. Chewah!!!!


Reflection: Project Dreamweaver

Reflection: Project Dreamweaver

Assalamualaikum


Entri kali ini merupakan reflection kepada apa yang telah saya pelajari Adobe Dreamweaver sepanjang kelas sebelum ini. Kami satu kumpulan yang terdiri daripada Ana Haziqah, Nor Farhah dan saya Nornadiah telah buat keputusan untuk buat Online Cake House.. Tujuan kami membina laman web ini adalah kerana x ramai peniaga di luar sana yang membina online cake. Yang selalu kita dengar adalah pakaian,handbag,accesories, dan banyak lagi. Lagi satu, kami memang suka sangat dengan kek ni. Oleh itu, ianya menjadi inspirasi buat kami untuk menyiapkan laman web ini dengan sungguh-sungguh. Kami juga telah membuat keputusan untuk membina dengan menggunakan PHP dan MySQL. =D

Orait, cuba kita ingat kembali langkah2 sebelum membina laman web:

1. Install web server (xampp)
2. Install Dreamweaver CS3
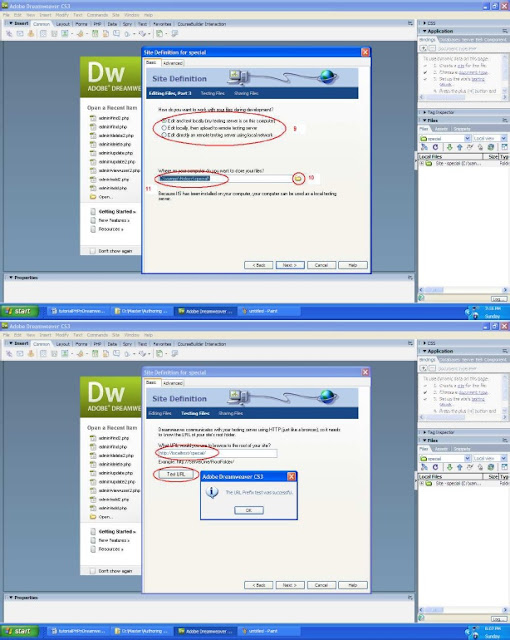
3. Define site in Dreamweaver CS3

1. Open Dreamweaver CS3
2. Click Site > New Site
3. Type site name > tasteofhome
4. Type HTTP URL address site > http://localhost/tasteofhome/
5. Click Next
6. Setting server technology > YES, I want to use a server technology
7. Select PHP MySQL
8. Next
9. Select 'Edit and test locally (my testing server is on this computer)'
10. Click folder icon to choose local root folder for site. Make sure store file in c > xampp> htdoc
12. Type site name at URL site root
13. Test URL. If successful, click OK and proceed next.
14. Select No and proceed next.


4. DEACTIVE Internet Information Services

1. Start> Control Panel > Administrative Tool > IIS
2. +Websites > default website
3. Click STOP button

5. LOCALHOST - Run Xampp 

1. Open Xampp Control Panel
2. Make sure run Apache and MySQL


6. Developing and Designing Website PHP and MySQL

1. Create database

Our database for this project named tasteofhome. We decide not to make password to our database because we worried that Prof Zaida could have problem later when opening our project. But then it is required to make password for security to our database.

2. Create table and insert data

Inside tasteofhome database contains 4 tables that are:

1. orderform - hold user's information and order.
2. signup - hold user's email, username and password when registered.
3. contact - hold user's information and feedback.
4. admin - hold admin's username and password. 


3. Setup connection between PHP and MySQL


______________________________________________________________________


For our project, our group has agreed to used PHP and MySQL to develop online cake house. This project has reflected all that we learnt in class before. Many elements such as image, video, hyperlink, anchor, layers and etc was included during web development. This online cake house is actually a webpage that allow user to view our product and can place an order after their sign up as member. But then, user must have come to our outlet to make payment and get the products.

There are two level of users in this webpage: 1. User  2.Admin. This two users have different level of access. User can only view the webpage, place an order and send a feedback. Meanwhile, admin  have the authority to view webpages, insert user, delete user, view user, edit user, insert order, delete order, view order and edit order. Below I will display the interface between this two users:

USER

If users are not registered, they only can see home page of the website.


1. User must first to sign up as member before sign in into the webpage. For sign up we use concept of integrating security into an application with registration page. We use Check New Username behavior to avoid different users from using the 100% same username as previous user. We also create a message to inform the user that the username has been used by other users.


2. After that, user must sign in to view product and place an order. Sign in also called as integrating security into an application. For integrating security just go Server Behaviors > User Authentication > Log In User. In this project, we just select Username and Password for Restrict Access Based.


3. Now, the users can view Our Product, About Us, Services, Recipes, Order Form and Contact Us. We insert all elements in our webpages such as image, video, link, anchor, button, text and etc.

i. Our Product

This webpage will view all our products available in our cake house such as doughnuts, tarts, cakes, desserts, muffins, and macarons.


If we click button desserts, the webpage will direct to desserts webpage.All list of desserts will display as below.


ii. About Us

This will display information about our cake house.


iii. Services

Besides sold out cakes, macarons, dessert and so on. We also provide other services such as Cakes'  Classes, Celebration, Wedding Ceremony, Opening Ceremony, Family Day and etc. 


 iv. Recipes

This webpage will show you the hot recipes in this year with a video demonstration on how to cook it.


v. Order Form
Users can place their order in this webpages. To store user's order into the database, we use Insert Record behavior.


Then, we use RecordSet to view user's order from database. It will be references for the users to check whether the order submitted is correct or not.


vi. Contact Us
Users can send a feedback or suggestion by clicking Contact Us tab.


_______________________________________________________________________

ADMIN

1.For admin they dont have to sign up because the admin will register or specified by developers. But then, they still have to sign in before view admin webpages.

2. Admin can view all webpages same as users and added webpages such as view user, edit user, insert user, delete user, view order, edit order, insert order and delete order.

3. Belows are captured screens that additional webpages that admin can view

i. View User
This webpage will view all the user's email, username and password that registered before. As I mentioned before, we use RecordSet to view user's information from database.


ii. Edit User
1. For edit user, we create two php files; edituser.php and edituser2.php. It is because for edituser.php, it will display all the user registered meanwhile edituser2.php will display the information that you want to edit or update.

2. In edituser.php file, we use RecordSet too for view user's information from database.

3. Then, we highlight the second row and perform Repeat Region. Repeat Region is used to display how many data from database to your webpage. You can set it by click Application > Server Behaviors >+ > Repeat Region.

4. Highlight the ID Recordset. Click Application > Server Behaviors > +> Go To Detail Page. The function of Go To Detail Page is to provide more details on a single database record. To retrieve details on only one record, the detail page must include a recordset that filters the records of a database table based on some unique identifier. Thats why we use ID to find information on just a single and simply search for one record that matches a particular ID number. In other words, create a recordset that filters the data based on that ID number.


5. In edituser2.php file, we insert Update Behavior so admin can updating information on users.


iii. Insert User
Admin can also insert new users.


1.   Insert form.
2.   Insert table and place it in the form for lay out.
3.   Insert form > textfield for email. Edit textfield properties (at the bottom page). Instance name for textfield to email.
4.   Repeat insert form > textfield for username and password.Make sure for password   select radio button password properties. 
5.   Select Application > Server Behavior > + > Insert record.
6.   Insert record details need to fill this section :Connection, Insert table, column, After inserting go to. For column choose ID. 
7.   Done and test in browser.


iv. Delete User


1. Open page deleteuser.php
2. Use Recordset
3. Insert > Form > Form.
4. Insert table into the form. 2 rows, 5 columns. Insert Delete link in column 1 to link to  page deleteuser2.php.
5. Binding recordset into table.
6. Edit PHP Code. Highlight on delete link then click code or split. Add code and save.

<a href="deleteuser2.php?recordID=<?php echo$row_Recordset1['ID'];?>" tar et="_ arent">Delete</a>

This action will link to deleteuser2.php and display information of ID that user choose to delete.


Open deleteuser2.php, perform this steps.

 1. Insert > form > form.
3. Insert > table > rows:4, columns:2.
4. Insert > form > text field (for all field want to show to the table).
5. Insert > form > button. (Delete button).
6. Insert > form > Hidden Field.Click Hidden Field icon > Properties > change name to
hidden1
7. Setting Recordset.Application > Binding > + > Recordset

Set filter to ID = URL Parameter recordID.

8. Binding Recordset into table.
9. Binding Recordset into hidden field
    •Click Hidden Field icon > Properties
    •click icon 'lightning bolt'
    •in dynamic data > click ID
    •click OK.


10. Click Application > Server Behaviour > + > Delete Record

Primary key column: ID , untick numeric
Primary key value: Form Variable , hidden1.

11. Save and test in web browser.


------------------------------------------------------------------------------------------------------------
*The steps for view order, edit order, insert order and delete order are likely the same as steps in above for user.

v. View Order

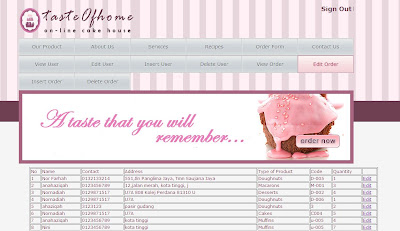
vi. Edit Order


vii. Insert Order


viii. Delete Order


Before delete the order, it will display the information details for admin to confirmation.


Reflection: Week 15


Reflection Week 15

Assalamualaikum


Minggu ini merupakan kelas yang terakhir buat kami pada semester ini. Kami semua dikehendaki memulangkan iPad serta Wacon yang pinjam sebelum ini. X best sgt sbb saya x dapat gunakan lg iPad huhuhu.. Apps 1,2,3,4 sangat membantu saya dalam pembelajaran Adobe Flash selama ini. Kalau minggu lepas,saya belajar Drag and Drop tetapi kelas pada hari ini belajar untuk menandakan betul sekiranya pelajar meletakkan jawapan di tempat yang betul.


Antara langkah-langkah untuk membuat drag and drop adalah seperti berikut:

1. Create the circle and rectangle on the left side and convert it to movie clip symbols. While create two rectangles on the right side and convert it to movie clip symbols. Next create Next button symbols.  

2. Draw a rectangle in the first frame of the movie clip.

3. Then add stop action script on the frame.

4. Add a keyframe in frame 2 by press F6 and add stop action script on the frame.

5. Add also a red line  on the rectangle in frame 2 in the movie clip timeline.

6. Go back to your scene (Scene 1).

7. Open your library and drag place movie clip into the stage (in response layer). Rename the instance as box 1.

8. Drag place movie clip into the stage for the second time (in response layer). Rename the instance as box 2.

9. Create a movie clip symbol and draw a rectangle and name it as rec. Create another movie clip symbol and name it as circle.

10. Drag both movie clips on the stage (in the same layer).

11. In layer 5, insert stop action script.

12. Click at circle symbol in circle layer and add the following actionscript:

Actionscript behind the circle:

on(press){
startDrag(this);
}
on(release){
stopDrag();
if((this._x>=* lowest value for x in the box*)&(this._x<=*the highest value for x)&(this._y>=*the lowest value for y)&(this._y<=*the highest value for y))
{
_root.box1.gotoAndStop (2);
}else{
_root.box1.gotoAndStop (1);
this._x=*the origin of x-default location*;
this._y=*the origin of y*;
}
}

13. Click at rec symbol in circle layer and add the following action script:

Actionscript behind the rectangle:

on(press){
startDrag(this);
}
on(release){
stopDrag();
if((this._x>=* lowest value for x in the box*)&(this._x<=*the highest value for x)&(this._y>=*the lowest value for y)&(this._y<=*the highest value for y))
{
_root.box1.gotoAndStop (2);
}else{
_root.box1.gotoAndStop (1);
this._x=*the origin of x-default location*;
this._y=*the origin of y*;
}
}


14. Repeat it for the rectangle.

15. Save your file and test the movie.


Berikut merupakan paparan skrin bagi drag and drop tersebut:


Paparan ini menunjukkan tanda betul apabila circle diletakkan di tempat yang betul.


Paparan ini pula menunjukkan tanda betul apabila rectangle diletakkan di tempat yang betul.


Akhir sekali, anda boleh cuba dan lihat drag and drop ini di dalam google site saya nadeeya.


Monday, 17 December 2012

Reflection: Week 14


Reflection Week 14


Assalamualaikum


Minggu ini kelas kami dimulakan dengan membuat 4 aktiviti di facebook iaitu:


Aktiviti 1
Develop a motion tween animation of pendulum

Aktiviti 2
Develop a morphing animation of butterfly lifecycle. Start from lava to butterfly.


1. Sketch the egg, caterpillar, pupa and butterfly using onion skin tool.
2. On first layer, type the text, box and arrows.
3. Create a new layer.
4. Import egg,caterpillar, pupa and butterfly image to library. Then convert to graphic symbol.
5. On frame 1 insert egg graphic, then break apart. Next insert keyframe on frame 25, add caterpillar graphic and break apart. Create motion tween between the frames.
6. Next continue insert keyframe on frame 50,add pupa graphic and break apart. Create motion tween between the frames.
7. Then add butterfly graphic on frame 75 and break apart. Create motion tween between the frames.
8.Lastly, add egg graphic on frame 100 and dont forget to break apart. Create motion between the frames.
9. Save your file and test movie.


Aktiviti 3
Implementing frame by frame skill, sketch a cartoon and animate it.


1. Sketch animated panda by using onion skin tool.
2. Then insert the panda sequence images from frame 1 until frame 20. Dont forget to insert keyframe for each image.
3. To make panda moving, we must insert motion tween between the keyframes.
4. Thats all, save and test movie =D

This is another frame by frame movie


Aktiviti 4
Animate the process of pollinating agent


Seterusnya, kami diberi tugasan App 4 untuk disiapkan dan dimuat naik di dalam google sites.Sebelum itu, mari kita lihat apa yang terdapat dalam App4.


Terdapat empat types of interaction dalam flash iaitu:
1. Creating Main Menu
Creating main menu buttons is essential for interactive website to navigate from one page to another.

2. Multiple Choice Questions
This type of applications allow students to get interactive feedbacks from the content. Users could also could create flash-based quizzes with multimedia elements, such as images, sounds, narrations, movies and so on.

3. Text Entry Questions
Allow users to develop quizzes and allow interactive communication between the user and the content. 

4. Drag and Drop
It is another applications that users could build in flash to make learning activities more fun and interesting.


Aktiviti 4

Seperti biasa kami akan diberikan aktiviti setelah habis kelas. Aktiviti 4 ini boleh dilihat dari google site saya nadeeya.Berikut merupakan hasil aktiviti yang telah saya lakukan:


Question 1
Creating Multiple Choice Questions


  1. Rename the layer as question > select text tool > change to static text at properties windows > type your question.
  2. Insert a new layer named buttons > create four oval tool (A,B,C,D)  > Then convert to symbol as button > OK.Then click text tool > type the answer.
  3. Create a new layer renamed as response. In the layer, select text tool > change to dynamic text at properties windows.
  4. Create another layer named as actions, write this command at actions script.
         stop();
         var response
         response = “ “


    5.  On the right answer button, write this command at actions script.
         on(release)  
        {respon = “Congrates, your answer is correct”);}
    6.  Do the same command to other buttons but this time change the respon as below:
         on(release)  
        {respon = “Your answer is wrong”);}
    7. Test your movie and finished!!!


Inilah hasilnya selepas mengikuti langkah-langkah dalam Apps 4.

Paparan skrin ini menunjukkan apabila pengguna memilih jawapan yang tepat.

Manakala, paparan skrin tersebut akan keluar jika pengguna memilih jawapan yang salah.


Question 2
Text Entry Question


  1. Create a layer named background, make sure that the topic as static text.
  2. Insert a new layer and named as question, type the questions. Draw a text tool as input text for the user to input the answer. Then draw another text tool under it as dynamic text.
  3. After that, create a new layer named as button. Then choose a playback button from the library and create besides the text.
  4. Create a stop layer, type this command to the actions script.
         stop();
         var answer;
         var respon;
         answer = “ “
         respon = “ “
     5. Select the playback button, right click and type this command to the actions script.
         on (release)  { if(answer == ”print client”) { respon = “Correct!”;
         } else {
         respon = “Incorrect. Your answer “+ answer +” is incorrect.”;
         }
         }

         on (release, keyPress “<Enter>”) {
         if (answer == “print client”){ respon = “Correct!”;
         } else {
         respon = “Incorrect. Your answer “+ answer +” is incorrect.”;
         }
         }
     6. In the input text field, type the var as answer meanwhile in the dynamic text field as respon.       
              Don’t forget to untick Auto kern in the window properties.
          7. Test your movie by press Ctrl+ Enter and done!!!!


Inilah hasilnya selepas mengikuti langkah-langkah dalam Apps 4.

Paparan skrin ini menunjukkan apabila pengguna memilih jawapan yang tepat.


Manakala, paparan skrin tersebut akan keluar jika pengguna memilih jawapan yang salah.


 Question 3
Creating Main Menu


  1. Create the basic interface such as insert logo image, header for the website and button          (home, about us and services).
  2. For each button, field the instance name. For example, the home button will named as home in the instance button. And goes to another buttons.
  3. Create a new scene for another section, by click Windows > Other Panels > Scene> Scene Windows will appear. Click duplicate symbol to copy a new scene. Rename the scene as Scene 2 and close the Window.
  4. Insert some text in Scene 1 and Scene 2 to differentiate the scene. Then test the movie to see whether the scenes are different.
  5. Put stop(); command in actions script in the buttons layer so that the two scenes will not keep on blinking.
  6. Insert frame at frame 15 for each layer so that if we click the button, it will direct to the required scene.  Do this on Scene 1 and Scene 2.
  7. In Scene 2, create a new layer and named it as about us. Then, renamed the frame as aboutpage. Create another layer for stop command in actions script.
  8. Go back to Scene 1, right click on about us button and click actions.Type
         on(release)  
         {gotoAndPlay (“Scene 2”, 1);}
     9. To make the the home button activated, go to scene 2 and right click on home button to write       
         command in actions script.
         on(release)  
         {gotoAndStop (“Scene 1”, 1);}
   10. Press Ctrl+Enter to test the movie, you can see that if you click Home button, it will go to   
         Scene 1 and Scene 2 if you click About Us button.
        11.  Create a new button in Scene 2 for more information about the library. On the frame 10 in
              about us layer,named the frame as moreinfo. Then type text for the more information. After
              that, renamed the more button as moreBtn.
        12.  Right click on the More button, then add command actions script.
         on(release)  
        {gotoAndStop (“Scene 2”, “moreinfo”);}
        13. Lastly, steps on how to navigate the Services button to other website. Go back to Scene 2,
             then add actions script in Services button. Repeat step 13 for Scene 2.
        on(release)  
        {getURL (“http://web.utm.my/psz/”);}
   14. Test your movie whether it is working or not and finished!!!


Inilah hasilnya selepas mengikuti langkah-langkah dalam Apps 4. Paparan skrin ini menunjukkan pengguna berada di skrin home.


Manakala paparan skrin ini menunjukkan pengguna berada di skrin about.

Apabila pengguna tekan button more, paparan skrin ini akan keluar.


Seterusnya, pengguna akan ke website lain jika menekan button service.


Question 4
Drag and Drop


  1. Create your interface by insert 3 rectangle named as dog,cat and rat in the rectangle layer. Then convert them to symbol as movie clip.
         2.   Then insert another layer and named as pictures. Insert the image of dog,cat and rat to the
              stage. Convert them to symbol as movie clip.
         3.  Next step, right click on the dog rectangle shape and insert this command.Repeat this step for    
              another rectangle shape and pictures.
        on (press)  {
        startDrag(this,true);
        }

        on(release) {
        stopDrag();
        }
    4. Don't forget to test your movie okay =D


Inilah hasilnya selepas mengikuti langkah-langkah dalam Apps 4. Pengguna boleh menggerakkan gambar haiwan tersebut ke tempat jawapan yang disediakan.

Paparan ini menunjukkan jika pengguna sudah selesai menjawab soalan.


Akhir sekali, ini merupakan paparan apabila saya telah memuat naik aktiviti-aktiviti tersebut di dalam Google Site =D